Perspective Tutorial TIME TO MAKE YOUR EYES BLEED GUYS!!!!

L0cke drew this (so i dont get in trouble)
This is going to be a drawing exercise which will help those who are having a little trouble with understanding basic perspective, and a good exercise for those who are already experienced with drawing in perspective.
First I'm going to be covering the basics of one points and two point perspective. Then I'm going to give a brief explanation on three point perspective. Then I'll give you some exercises.
One-point perspective In one-point perspective, the forms are seen face on and are drawn to a single vanishing point.

This is a basic example of one point perspective. The horizontal line is called a horizon line, and it represents well... the horizon =P . The X labelled "VP" is the vanishing point, since all objects vanish from your vision at that point. The lines coming from the vanishing point are your orthogonal lines. They are the lines that put objects into perspective. They create the illusion of depth
One point perspective can be as simple as this

Or as complicated as this

When starting your perspective drawing you're going to want to first start out with a horizon line. In a panel where do you want your reader to view the scene from. The higher you raise your horizon line the further up your viewer is. The lower you place your horizon line the further down your viewer is. Its up to you.
So first draw your horizon line.

Second you're going to want to place your vanishing point onto the horizon line. Think about where you want your objects to vanish.

Next step would be drawing the front of whatever object you wish to place into perspective

From front of what you've drawn, use lines to connect this object to the vanishing point

Lastly draw a vertical and horizontal line where you want the object to end

There is your most basic of basics for one point perspective. Try stacking objects and placing them into perspective. Add more objects!
Two-Point Perspective
Two-point perspective is useful to show an angle rather than just face-on. It requires and additional vanishing point, and the vanishing points are often located off the page, and a good distance apart.
The same rules apply to the horizon line. The further you raise the line the further up your viewers with be. The further down the horizon line goes the lower your viewers will be.
First, draw your horizon line across the page. Mark two vanishing points. I'm gonna explain the rest through these handy images =P

Keep in mind that this vertical line can be place anywhere between the two points. Up down left right


You draw the verticle lines at the back edges of your object

If the object is floating above your horizon like you still connect to opposite corners the same way

AND THATS IT. Now keep in mind that you want the two vanishing points to be a good distance apart. If you draw them too close your object becomes skewed like the object in the demonstration (see how sharp the bottom angle is... thats skewed). The vanishing points are close for the purpose of explanation, but technically that object is no bueno.
Another trick is drawing very SMALL when you have points this close, but I know how you guys love details =P
THREEEE POINT PERSPECTIVE
This is the tragic one guys. I'm going to be very brief on this one because frankly its a bitch.
In three point perspective you have three vanishing points. This type of perspective usually applies when you're viewing an object from either bird's eye view (super high up) or worm's eye view (super low)
Draw your horizon line, and place your vanishing points like you do in two point perspective. Now you're going to place your third point. The lower you place your point the higher the viewer is. The higher the point the lower the viewer is.
You're not going to just be drawing a vertical line to place your object. Instead you're going to be drawing a nifty little line from the brand new vanishing point. You can draw this line at any angle (even vertical) but its has to stem from the third vanishing point. Then you will draw additional lines, stemming from the new vanishing point, on either side of your first line to define the shape of the object.
From there, like in two point perspective, you draw lines from your two vanishing points on the horizon to define the top and bottom edges of the object you're drawing. Then connect that lines opposite at the back.
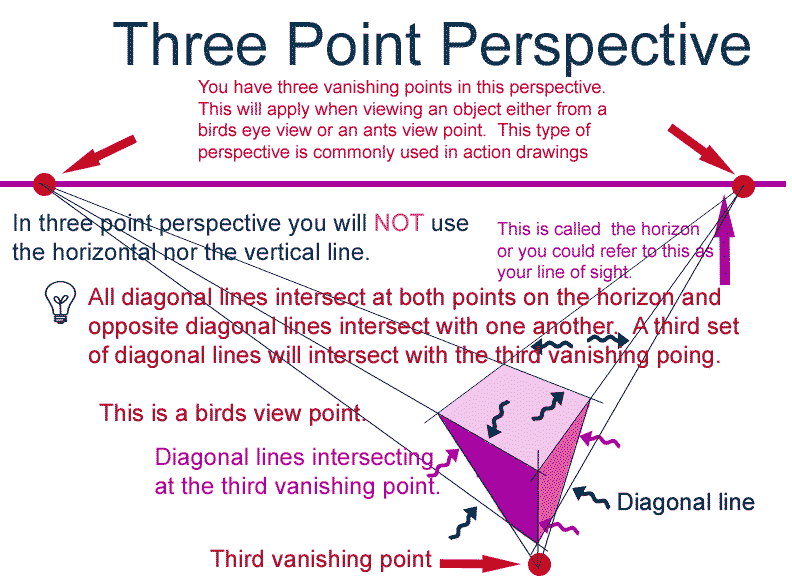
This guide is probably way more helpful than everything I just said up there =P
Alright thats the conclusion of my tutorial. Perspective isn't something you're going to master immediately. It requires a lot of practice, and a lot of coffee... maybe some cigarettes, but I can't even begin to explain the benefits of mastering perspective. So keep at it!!
PRACTICEI want everyone to do 5 drawings total. Two in one point perspective, and another two in two point perspective. The last one is your own choice of perspective =P
NO TREES IN bare FIELDS. hehehe I want the subject matter to be based around man-made structures with sharp angles and fun little details. Buildings, houses, powerplants etc
Again make sure your lines are either clean pencils or inks.
PS!!!!
Unless you are a total novice at perspective, I don't expect to see the horizon line (unless its part of your drawing) or the lines connecting to the vanishing point (technically called orthogonal lines but i never remember that and I don't expect anybody else to) in your drawings for the practice =P


HR99 Spring 2024 Shorts
HR99
@ 8:04 AM May 7th