Introduction to Photoshop

Introduction to Photoshop
« on: Feb 21, 2008, 04:25 PM »
Introduction to Photoshop

Photoshop can be a little scary at first, but once you get the basics and shortcuts down, it's pretty easy to get around in the program.

The Photoshop Tool Bar


1.Rectangular Marquee Tool (shortcut is "M")-a selection tool, can be made into a circle and single line as well.
2.Move Tool (shortcut "V")-move the image, layer, etc.
3.Polygonal Lasso Tool (shortcut "L")-another selection tool, this also houses the magnetic selection tool(your selection "attaches" to pixels), or the lasso tool (a more freeform selection)
4.Magic Wand Tool (shortcut "W")-easily select stuff with this
5.Crop Tool (shorcut "C")-crop your image with this
6.Slice Tool (shortcut "K")-allows you to "slice" an image into smaller sections while still being connected
7.Healing Brush Tool (shortcut "J")-is activated by selecting a part of the image while holding alt. Essentially it's used for repairing things like dust, scratches, etc. on an image.
8.Paint Brush Too (shortcut "B")l-allows you to draw/paint on an image
9.Clone Stamp Tool (shortcut "S")-activated by holding Alt and clicking somewhere on the image. Allows you to clone the selection and place it elsewhere on the image. Useful for things like carpet, grass, but really only helpful in photos primarily.
10.History Brush (shortcut "Y")-replaces an area of the image with an earlier version of the image you were working on
11.Eraser Tool (shortcut "E")-erases
12.Paint Bucket Tool (shortcut "G")-fills in closed areas with a select color or pattern.
13.Smudge Tool (shortcut "R")-smudges pixels, can be useful when digitally painting but is a major RAM hog. This tool also houses the Sharpen and Blur tools which sharpen/blur an image.
14.Dodge Tool (shortcut "O")-Makes pixels lighter. Also houses the Burn Tool that makes them darker and the Sponge Tool changes the saturation of an image.
15.Path Selection Tool (shortcut "A")-used with the Pen Tool to edit paths. Also houses the Direct Selection Tool selects a single point when using the pen tool.
16.Horizontal Type Tool (shortcut "T")-make text.
17.Pen Tool (shortcut "P")-creates/removes paths. This one is pretty complicated and is used for creating vector images.
18.Line Tool (shortcut "U")-creates a line. This also houses tools that make different shapes.
19.Notes Tool (shortcut "N")-adds little post its on your image for personal reference
20.Eyedropper Tool (shortcut "I")-selects a color present on an image
21.Hand Tool (shortcut "H")-allows you to move a layer/selection around
22.Zoom Tool (shortcut "Z")-allows you to zoom in/out
23.Foreground/Background Colors, hit "D" to set them back to their default
24.Mask Tools (shortcut "Q")-add masks to your image
25.Jump To Image Ready (shortcut CTRL+SHIFT+M)-opens Image Ready, something Photoshop should have come with

Important Shortcuts
CTRL+A will select everything
CTRL+U will bring up the Hue/Saturation menu
CTRL+D will deselect everything
CTRL+SHIFT+N will create a new layer
Holding SHIFT while selecting something will allow you to add onto previous selections (polygonal lasso, rectangle selection, etc)
Holding ALT while selecting something will allow you to subtract from previous selections
[ will shrink the size of the brush you are working with
] will increase the size of the brush you are working with
Holding the SPACEBAR down and clicking around the image will allow you to drag the canvas around
CTRL+ the "+" key will allow you to zoom in
CTRL+ the "-" key will allow you to zoom out
CTRL+S will allow you to save your progress
CTRL+E will merge 2 layers
CTRL+T free transform, will also open the text menu if you have the text tool selected

Anatomy of Layers

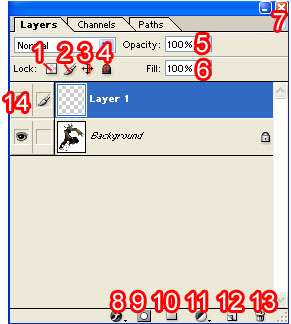
1.Lock transparent pixels-you can't draw outside what it already present on the layer
2.Lock image pixels-you can't make any marks on this layer
3.Lock position-you can't move this layer
4.Lock all-locks everything on that layer
5.Opacity-how much the layer shows up, lower it to make it more transparent
6.Fill-similiar to opacity
7.Options drop down menu, can add layers from here, change layer properties, etc.
8.Layer Options-different effects that can be used on that selected layer
9.Add a layer mask-control what does or doesn't show up on a layer, more in depth explaination here http://www.lunacore.com/photoshop/tutorials/tut003.htm
10.Create a layer group-group your layers for easier control and organization
11.New adjustment layer-you can control different colors and effects of the layers below it with this
12.Create a new layer-creating a new layer
13.Delete a layer-delete the selected layer
14.Layer visibility-make a layer appear or disappear

Filters
Don't use them. They can be used successfully in rare circumstances but if you're just starting out with Photoshop, don't touch them. People often go crazy with them and use them as much as humanly possible when they first touch Photoshop. So for now, just forget that section exists, you don't need it.

Kittens wearins mittens

Re: Introduction to Photoshop
« Reply #1 on: Aug 30, 2009, 09:03 PM »
Could someone explain the differences (both in the tools and their uses) between these similar devices?

Brightness/Contrast
Levels
Curves

All three can be used for the same purpose of lineart prep, but I'm not clear on their strengths and weaknesses, nor am I familiar with other uses they may have. Anybody who's well-versed in these tools, help would be appreciated!

Re: Introduction to Photoshop
« Reply #2 on: Aug 31, 2009, 12:00 AM »
They kiiinda do the same thing... with brightness/contrast you are going to have less control. I use levels, others use curves, I'm not sure what the advantages to curves are, but I will offer up with I know about levels and a little trick that I do. It's basically picking a tone to be the new black, and a new tone to be the new white.... therefore you can make your light pencil lines black, and make the floating junk and smudges white. I'm super bad at explaining stuff, so if anyone can explain this better feel free to show up my little demo haha.

For this I just scanned some pencils.

just click the link, because I made the image a little large....
http://totallylamerobot.com/void/levelsy.jpg

Re: Introduction to Photoshop
« Reply #3 on: Aug 31, 2009, 12:41 AM »
Could someone explain the differences (both in the tools and their uses) between these similar devices?

Brightness/Contrast
Levels
Curves

All three can be used for the same purpose of lineart prep, but I'm not clear on their strengths and weaknesses, nor am I familiar with other uses they may have. Anybody who's well-versed in these tools, help would be appreciated!

You basically listed those 3 in order of easiest to hardest to use, Pi. I'll do my best to explain. If something seems unclear, feel free to ask.

Out of all those three, Brightness/Contrast is definitely hands down the simplest and most straightforward one to use. It has the clear advantage of helping you do a quick adjustment over your image without many complications, brightness merely adjusting the exposure of light to the overall image, and contrast indicating how much the exposure affects the picture. It's good to use and a quick fix if your lineart is really easy to clean up, or you think your finalized picture or scan turned out too dark or light - but at the same time, due to having just two sliders for their toggling, you are disadvantaged with not getting to adjust the more specific aspects of the image.. which brings us to...

...Levels. Which is different in the way that here, you have 3 sliders. White, Midtone, and Black. The window there maps a histogram of your image based on the RGB input. If you place a slider where the histogram areas are most extreme, you get the most contrast out of that area for that specific input. (ie. Placing the white slider underneath a huge peak would bring the most brightness out of your image based on the areas that are so.) The function of this is more directly tailored for the colors and specific values of the image, as there is an Auto-Levels option below it to quickly adjust so that you get an adequate contrast as well as balance of color out of your picture if it's biased to a particular palette (too much yellow? Perhaps the Auto-levels would throw in some magentas or blues for complement. Picture too dull? It'll make shadows darker and lit areas brighter.. etc) If Brightness/Contrast doesn't fix your lineart, Levels could do the trick, as you have an extra slider to fix certain degrees of your image.  

And last but not least- Curves. I'm not as well-versed in the functions of this tool because I've used it later than the others, but I'll try. The tool was created in mind of the visual dynamics with what we see versus what's actually there on paper. To use it, you create anchors to adjust your values perhaps even more specifically than you can in the Levels histogram because you can make up to 16 of them. Click the line in a center and you notice it makes a point. If you drag it to the top-left, you notice your midtones get brighter. Take it down towards the bottom-right corner, they get darker. Working with more than one anchor tends to be a hassle though, so I don't usually bend that line too much lest my colors all get screwed over. An S-curve created with the bend by 3 anchored points would probably be desirable, though. The highlight of the curves function however, as far as lineart goes - is their eyedroppers. Grab an adjusted scan with ink on pencil and look at the bottom left of the box and you see 3 eyedroppers; black, midtone, and white. Click the white one and apply it to the darkest pencil mark on your paper against your inks. bamf. The majority of pencil marks should practically be gone, and even if there were a few specks left over, they'd be easy clean up with the eraser or brush. Now, go get the black one and apply it to the lightest ink mark on your paper, and SHAZAM. The inks solidify where there are weaker or lighter portions. Of course if you mess up on those areas, just keep looking around and eye-dropping away until you get it right.. or just close it and start it up again.

But yeah. None of these tools are really better over the other because they all work in different ways, it all depends on your process and how you work with your lines.. If you make dazzlingly clean marks.. you might not even have to use curves to do that heavy duty clean up with your stuff, for instance. Okay I'm done.
« Last Edit: Aug 31, 2009, 12:49 AM by Airlight »

Re: Introduction to Photoshop
« Reply #4 on: Aug 31, 2009, 07:37 AM »
I'm a levels man myself...I can never seem to get things looking exactly right using curves, and brightness/contrast usually doesn't offer as exact control (which is especially important for me, since I used a lot of drybrush, washes, etc, and don't always want perfectly black lineart).

Also I've recently started drawing in blue pencil and it's been the biggest time saver ever.  So much easier than erasing 'normal' pencil and it's simple to get rid of the blue in photoshop....I can do a quick tutorial on it if people are interested.

Re: Introduction to Photoshop
« Reply #5 on: Aug 31, 2009, 08:22 AM »
Blue pencil is indeed the best time saver for straight inks, but I've found that when I want to do tones traditionally, I can't haev both unless I want to print out another copy of my lineart.

I've always used curves, but if they really are all the same, I might change to levels for ease of use.

Re: Introduction to Photoshop
« Reply #6 on: Aug 31, 2009, 08:57 AM »
Im all about the curves. I first used it after reading a quick tutorial and I never had any problems with it. They work fairly nice for color pictures aswell in my opinion.

Re: Introduction to Photoshop
« Reply #7 on: Aug 31, 2009, 10:06 AM »
Blue pencil is indeed the best time saver for straight inks, but I've found that when I want to do tones traditionally, I can't haev both unless I want to print out another copy of my lineart.

Really?  How are you getting rid of the blue?  I've been doing it using channels and haven't noticed any effects on b/w tones...are you talking about colored tones or am I doing something wrong and messing up my scans in a way I haven't noticed?

Re: Introduction to Photoshop
« Reply #8 on: Aug 31, 2009, 08:50 PM »
Oh, I meant that you have to fix your blue-lined inks in PS, then print out a copy of your clean inks, and tone/color from there. Not much of a time-saver compared to just using regular pencil and erasing, haha.


Newest Comments -


Newest Characters -

 
Morrigan KingAugustus ThomasTheakonRod ChirpwoodHuskMizz BonzaiSpidella WidowsMyrmidonGhoulArcher Heart Mercury
 

Open Challenges -

 
No open challenges
Create a new challenge


Latest Topics -

 
All News, All The Time 
Last updated: Staff Bot - Apr 22, 2024, 11:47 PM
Revelarts images 
Last updated: Revelarts - Apr 16, 2024, 02:38 PM
Revelarts-ubator  
Last updated: Revelarts - Apr 15, 2024, 10:25 PM
Clown Jam 
Last updated: Radji - Feb 11, 2024, 04:51 AM
INTRODUCE YOURSELF 
Last updated: Maz - Nov 06, 2023, 04:13 PM
 

Latest Members -


Users online -

 
541 Guests, 0 Users


Most Online Today: 548.
Most Online Ever: 1,184 (Jan 13, 2020, 06:21 PM)


About Us

We exist to provide an environment for artists to learn and improve their sequential art skills competitively. Our community is designed to give critical feedback and encouragement to our many members the world over, at all skill levels.

Follow Us